pacman是arclinux中的软件管理工具,可以直接从网络上的软件仓库下载安装及删除软件,自动处理依赖关系,类似ubuntu中的apt-get。pacman也是widows上msys2默认的软件管理工具。

安装软件

  • pacman -S 软件名: 安装软件。也可以同时安装多个包,只需以空格分隔包名即可。
  • pacman -S --needed 软件名1 软件名2: 安装软件,但不重新安装已经是最新的软件。
  • pacman -Sy 软件名:安装软件前,先从远程仓库下载软件包数据库(数据库即所有软件列表)。
  • pacman -Sv 软件名:在显示一些操作信息后执行安装。
  • pacman -Sw 软件名: 只下载软件包,不安装。
  • pacman -U 软件名.pkg.tar.gz:安装本地软件包。
  • pacman -U http://www.example.com/repo/example.pkg.tar.xz : 安装一个远程包(不在 pacman 配置的源里面)。

更新系统

  • pacman -Sy: 从服务器下载新的软件包数据库(实际上就是下载远程仓库最新软件列表到本地)。
  • pacman -Su: 升级所有已安装的软件包。

pacman 可以用一个命令就可以升级整个系统。花费的时间取决于系统有多老。这个命令会同步非本地(local)软件仓库并升级系统的软件包:

1
pacman -Syu

在msys2中 pacman -Syu后需要重启一下msys2(关掉shell重新打开即可)。

在Arch linux中,只支持系统完整升级,不支持部分升级。所以即使在msys2中,pacman -Syu也会升级整个系统。可以观察一下,即使新安装的msys2,pacman -Syu后,msys2安装目录占用空间立马变大很多。 如果升级时,网络比较慢,觉得既浪费时间又浪费硬盘,实在不想升级那么多东西,可以逐个软件包升级。用下面命令可以升级核心包:

1
pacman -S --needed filesystem msys2-runtime bash libreadline libiconv libarchive libgpgme libcurl pacman ncurses libintl

卸载软件

  • pacman -R 软件名: 该命令将只删除包,保留其全部已经安装的依赖关系
  • pacman -Rv 软件名: 删除软件,并显示详细的信息
  • pacman -Rs 软件名: 删除软件,同时删除本机上只有该软件依赖的软件。
  • pacman -Rsc 软件名: 删除软件,并删除所有依赖这个软件的程序,慎用
  • pacman -Ru 软件名: 删除软件,同时删除不再被任何软件所需要的依赖

搜索软件

  • pacman -Ss 关键字: 在仓库中搜索含关键字的软件包(本地已安装的会标记)
  • pacman -Sl <repo>:
    • 显示软件仓库中所有软件的列表
    • 可以省略,通常这样用:`pacman -Sl 关键字`
  • pacman -Qs 关键字: 搜索已安装的软件包
  • pacman -Qu: 列出所有可升级的软件包
  • pacman -Qt: 列出不被任何软件要求的软件包

参数加q可以简洁方式显示结果,比如pacman -Ssq gcc会比pacman -Ss gcc显示的好看一些。

pacman -Sl gccpacman -Ssq gcc很接近,但是会少一些和gcc有关但软件名不包含gcc的包。

查询软件信息

  • pacman -Q 软件名: 查看软件包是否已安装,已安装则显示软件包名称和版本
  • pacman -Qi 软件名: 查看某个软件包信息,显示较为详细的信息,包括描述、构架、依赖、大小等等
  • pacman -Ql 软件名: 列出软件包内所有文件,包括软件安装的每个文件、文件夹的名称和路径

软件包组

  • pacman -Sg: 列出软件仓库上所有的软件包组
  • pacman -Qg: 列出本地已经安装的软件包组和子包
  • pacman -Sg 软件包组: 查看某软件包组所包含的所有软件包
  • pacman -Qg 软件包组: 和pacman -Sg 软件包组完全一样

很多人建议通过安装软件组来安装工具链,例如:

  • pacman -S mingw-w64-x86_64-toolchain
  • pacman -S mingw-w64-i686-toolchain
  • pacman -S mingw-w64-x86_64-qt5
  • pacman -S base-devel

但是这样比较浪费空间。实际上如果把gcc, qt, clang等安装上,msys2就要占掉超过10G的硬盘空间,所以个人很少直接安装软件组。

清理缓存

  • pacman -Sc:清理未安装的包文件,包文件位于 /var/cache/pacman/pkg/ 目录。
  • pacman -Scc:清理所有的缓存文件。

最常用的pacman命令小结

pacman命令较多,作为新手,将个人最常用的命令总结如下:

  • pacman -Syu: 升级系统及所有已经安装的软件。
  • pacman -S 软件名: 安装软件。也可以同时安装多个包,只需以空格分隔包名即可。
  • pacman -Rs 软件名: 删除软件,同时删除本机上只有该软件依赖的软件。
  • pacman -Ru 软件名: 删除软件,同时删除不再被任何软件所需要的依赖。
  • pacman -Ssq 关键字: 在仓库中搜索含关键字的软件包,并用简洁方式显示。
  • pacman -Qs 关键字: 搜索已安装的软件包。
  • pacman -Qi 软件名: 查看某个软件包信息,显示软件简介,构架,依赖,大小等详细信息。
  • pacman -Sg: 列出软件仓库上所有的软件包组。
  • pacman -Sg 软件包组: 查看某软件包组所包含的所有软件包。
  • pacman -Sc:清理未安装的包文件,包文件位于 /var/cache/pacman/pkg/ 目录。
  • pacman -Scc:清理所有的缓存文件。

参考文章

前几天在网上看到了一篇 《BBR vs BBRplus vs BBR2 一般网络速度对比》 的文章,文章中指出了高版本内核下 BBR 速度有较大提升。

BBR vs BBR2 vs BBR Plus — 引用至原文

于是就心血来潮想要升级下 Debian 内核,在此记录。

更新内核

以下过程都需要有 root 权限!

添加 Backports 源

1
2
echo "deb http://deb.debian.org/debian buster-backports main" > /etc/apt/sources.list.d/backports.list
apt update

安装新内核

1
2
3
apt -t buster-backports install linux-image-amd64
apt -t buster-backports install linux-headers-amd64
update-grub

然后 重启 并查看内核是否已经更新:

1
uname -r

截止目前 Debian 的最新内核是:5.10.0-0.bpo.3-amd64,返回形如此的内容及更新成功。

卸载旧内核

1
dpkg --list  grep linux-image

输出形式如下:

1
2
3
ii  linux-image-5.10.0-0.bpo.3-amd64    5.10.13-1~bpo10+1            amd64        Linux 5.10 for 64-bit PCs (signed)
ii linux-image-4.19.0-14-amd64 4.19.171-2 amd64 Linux 4.19 for 64-bit PCs (signed)
ii linux-image-amd64 5.10.13-1~bpo10+1 amd64 Linux for 64-bit PCs (meta-package)

从中可以看出旧内核为:linux-image-4.19.0-14-amd64 在确保剩余至少一个最新内核下,删除旧内核:

1
apt purge linux-image-4.19.0-14-amd64

其他情况同理。同时也可以删除旧内核头文件:

1
2
dpkg --list  grep linux-headers
apt purge linux-headers-4.19.0-14-amd64

❗注意:卸载了旧内核后一定要确保剩余至少一个最新内核:

1
update-grub

在输出中至少能看到一个内核。

一般来说,日常使用只要记住下图6个命令,就可以了。但是熟练使用,恐怕要记住60~100个命令。 
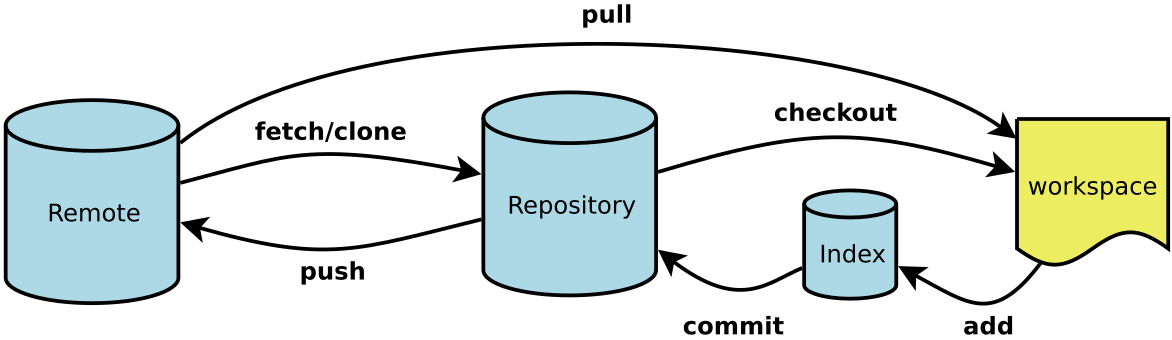
下面是我整理的常用 Git 命令清单。几个专用名词的译名如下。

  • Workspace:工作区
  • Index / Stage:暂存区
  • Repository:仓库区(或本地仓库)
  • Remote:远程仓库

一、新建代码库

1
2
3
4
5
6
7
8
9

# 在当前目录新建一个Git代码库
$ git init

# 新建一个目录,将其初始化为Git代码库
$ git init [project-name]

# 下载一个项目和它的整个代码历史
$ git clone [url]

二、配置

Git的设置文件为.gitconfig,它可以在用户主目录下(全局配置),也可以在项目目录下(项目配置)。

1
2
3
4
5
6
7
8
9
10

# 显示当前的Git配置
$ git config --list

# 编辑Git配置文件
$ git config -e [--global]

# 设置提交代码时的用户信息
$ git config [--global] user.name "[name]"
$ git config [--global] user.email "[email address]"

三、增加/删除文件

1
2
3
4
5
6
7
8
9
10
11
12
13
14
15
16
17
18
19
20
21
22

# 添加指定文件到暂存区
$ git add [file1] [file2] ...

# 添加指定目录到暂存区,包括子目录
$ git add [dir]

# 添加当前目录的所有文件到暂存区
$ git add .

# 添加每个变化前,都会要求确认
# 对于同一个文件的多处变化,可以实现分次提交
$ git add -p

# 删除工作区文件,并且将这次删除放入暂存区
$ git rm [file1] [file2] ...

# 停止追踪指定文件,但该文件会保留在工作区
$ git rm --cached [file]

# 改名文件,并且将这个改名放入暂存区
$ git mv [file-original] [file-renamed]

四、代码提交

1
2
3
4
5
6
7
8
9
10
11
12
13
14
15
16
17
18
19

# 提交暂存区到仓库区
$ git commit -m [message]

# 提交暂存区的指定文件到仓库区
$ git commit [file1] [file2] ... -m [message]

# 提交工作区自上次commit之后的变化,直接到仓库区
$ git commit -a

# 提交时显示所有diff信息
$ git commit -v

# 使用一次新的commit,替代上一次提交
# 如果代码没有任何新变化,则用来改写上一次commit的提交信息
$ git commit --amend -m [message]

# 重做上一次commit,并包括指定文件的新变化
$ git commit --amend [file1] [file2] ...

五、分支

1
2
3
4
5
6
7
8
9
10
11
12
13
14
15
16
17
18
19
20
21
22
23
24
25
26
27
28
29
30
31
32
33
34
35
36
37
38
39
40
41
42
43

# 列出所有本地分支
$ git branch

# 列出所有远程分支
$ git branch -r

# 列出所有本地分支和远程分支
$ git branch -a

# 新建一个分支,但依然停留在当前分支
$ git branch [branch-name]

# 新建一个分支,并切换到该分支
$ git checkout -b [branch]

# 新建一个分支,指向指定commit
$ git branch [branch] [commit]

# 新建一个分支,与指定的远程分支建立追踪关系
$ git branch --track [branch] [remote-branch]

# 切换到指定分支,并更新工作区
$ git checkout [branch-name]

# 切换到上一个分支
$ git checkout -

# 建立追踪关系,在现有分支与指定的远程分支之间
$ git branch --set-upstream [branch] [remote-branch]

# 合并指定分支到当前分支
$ git merge [branch]

# 选择一个commit,合并进当前分支
$ git cherry-pick [commit]

# 删除分支
$ git branch -d [branch-name]

# 删除远程分支
$ git push origin --delete [branch-name]
$ git branch -dr [remote/branch]

六、标签

1
2
3
4
5
6
7
8
9
10
11
12
13
14
15
16
17
18
19
20
21
22
23
24
25
26
27

# 列出所有tag
$ git tag

# 新建一个tag在当前commit
$ git tag [tag]

# 新建一个tag在指定commit
$ git tag [tag] [commit]

# 删除本地tag
$ git tag -d [tag]

# 删除远程tag
$ git push origin :refs/tags/[tagName]

# 查看tag信息
$ git show [tag]

# 提交指定tag
$ git push [remote] [tag]

# 提交所有tag
$ git push [remote] --tags

# 新建一个分支,指向某个tag
$ git checkout -b [branch] [tag]

七、查看信息

1
2
3
4
5
6
7
8
9
10
11
12
13
14
15
16
17
18
19
20
21
22
23
24
25
26
27
28
29
30
31
32
33
34
35
36
37
38
39
40
41
42
43
44
45
46
47
48
49
50
51
52
53
54
55
56
57
58
59
60
61

# 显示有变更的文件
$ git status

# 显示当前分支的版本历史
$ git log

# 显示commit历史,以及每次commit发生变更的文件
$ git log --stat

# 搜索提交历史,根据关键词
$ git log -S [keyword]

# 显示某个commit之后的所有变动,每个commit占据一行
$ git log [tag] HEAD --pretty=format:%s

# 显示某个commit之后的所有变动,其"提交说明"必须符合搜索条件
$ git log [tag] HEAD --grep feature

# 显示某个文件的版本历史,包括文件改名
$ git log --follow [file]
$ git whatchanged [file]

# 显示指定文件相关的每一次diff
$ git log -p [file]

# 显示过去5次提交
$ git log -5 --pretty --oneline

# 显示所有提交过的用户,按提交次数排序
$ git shortlog -sn

# 显示指定文件是什么人在什么时间修改过
$ git blame [file]

# 显示暂存区和工作区的差异
$ git diff

# 显示暂存区和上一个commit的差异
$ git diff --cached [file]

# 显示工作区与当前分支最新commit之间的差异
$ git diff HEAD

# 显示两次提交之间的差异
$ git diff [first-branch]...[second-branch]

# 显示今天你写了多少行代码
$ git diff --shortstat "@{0 day ago}"

# 显示某次提交的元数据和内容变化
$ git show [commit]

# 显示某次提交发生变化的文件
$ git show --name-only [commit]

# 显示某次提交时,某个文件的内容
$ git show [commit]:[filename]

# 显示当前分支的最近几次提交
$ git reflog

八、远程同步

1
2
3
4
5
6
7
8
9
10
11
12
13
14
15
16
17
18
19
20
21
22
23
24

# 下载远程仓库的所有变动
$ git fetch [remote]

# 显示所有远程仓库
$ git remote -v

# 显示某个远程仓库的信息
$ git remote show [remote]

# 增加一个新的远程仓库,并命名
$ git remote add [shortname] [url]

# 取回远程仓库的变化,并与本地分支合并
$ git pull [remote] [branch]

# 上传本地指定分支到远程仓库
$ git push [remote] [branch]

# 强行推送当前分支到远程仓库,即使有冲突
$ git push [remote] --force

# 推送所有分支到远程仓库
$ git push [remote] --all

九、撤销

1
2
3
4
5
6
7
8
9
10
11
12
13
14
15
16
17
18
19
20
21
22
23
24
25
26
27
28
29
30
31
32

# 恢复暂存区的指定文件到工作区
$ git checkout [file]

# 恢复某个commit的指定文件到暂存区和工作区
$ git checkout [commit] [file]

# 恢复暂存区的所有文件到工作区
$ git checkout .

# 重置暂存区的指定文件,与上一次commit保持一致,但工作区不变
$ git reset [file]

# 重置暂存区与工作区,与上一次commit保持一致
$ git reset --hard

# 重置当前分支的指针为指定commit,同时重置暂存区,但工作区不变
$ git reset [commit]

# 重置当前分支的HEAD为指定commit,同时重置暂存区和工作区,与指定commit一致
$ git reset --hard [commit]

# 重置当前HEAD为指定commit,但保持暂存区和工作区不变
$ git reset --keep [commit]

# 新建一个commit,用来撤销指定commit
# 后者的所有变化都将被前者抵消,并且应用到当前分支
$ git revert [commit]

# 暂时将未提交的变化移除,稍后再移入
$ git stash
$ git stash pop

十、其他

1
2
3

# 生成一个可供发布的压缩包
$ git archive

因为是虚拟机下使用,下载虚拟机专用的镜像 https://alpinelinux.org/downloads/    Virtual板块下载86_64镜像 当前 http://dl-cdn.alpinelinux.org/alpine/v3.12/releases/x86\_64/alpine-virt-3.12.1-x86\_64.iso 创建虚拟机 当前alpine内核是5.4,虚拟机创建及初始化过程略过  

apk update && apk upgrade && apk add sudo nano

下载并安装smartdns  from https://github.com/pymumu/smartdns  

wget https://github.com/pymumu/smartdns/releases/download/Release33/smartdns.1.2020.09.08-2235.x86\_64-linux-all.tar.gz
tar xvf smartdns.1.2020.09.08-2235.x86_64-linux-all.tar.gz && cd smartdns && chmod +x ./install && mkdir mkdir /etc/default && ./install -i

rc-service smartdns stop

mv /etc/smartdns/smartdns.conf /etc/smartdns/smartdns.conf.bak
nano /etc/smartdns/smartdns.conf
server-name smartdns
bind :53
bind-tcp :53
cache-size 1536
prefetch-domain yes
serve-expired yes
log-level info
server-tls 208.67.222.222:853
#server-https https://dns.twnic.tw/dns-query
server-tls 45.32.55.94:853
server-https https://cloudflare-dns.com/dns-query
server-https https://neatdns.ustclug.org/resolve
server-https https://doh.dns.sb/dns-query
server-https https://public.dns.iij.jp/dns-query
server-https https://dns.rubyfish.cn/dns-query
server-https https://dns.dns-over-https.com/dns-query
server-https https://jp.tiar.app/dns-query
server-https https://i.233py.com/dns-query
server 223.5.5.5:53
server 114.114.114.114:53
conf-file /tmp/whitelist.conf
conf-file /tmp/blacklist.conf
ipset /tracker.publicbt.com/block
ipset /tracker.publicbt.com/b-
address /tracker.publicbt.com/-
address /publicbt.com/-
address /www.publicbt.com/-
address /*.publicbt.com/-

取消DHCP DNS自动覆盖  

nano /usr/share/udhcpc/default.script
用#注释RESOLV_CONF=”/etc/resolv.conf”

修改本地DNS为127.0.0.1  

nano /etc/resolv.conf
nameserver 127.0.0.1

启动smartdns并测试  

/usr/sbin/smartdns
测试
nslookup -querytype=ptr smartdns

开机启动,默认的服务没法启动,未知  

/usr/sbin/smartdns

nano /etc/local.d/init_nextcloud.start
#!/bin/sh
/usr/sbin/smartdns
chmod +x /etc/local.d/init_nextcloud.start

rc-update add local

添加守护  

apk add monit
mv /etc/monitrc /etc/monitrc.bak
nano /etc/monitrc
set daemon 10 #10s循环监控
set logfile syslog
check process smartdns with pidfile /var/run/smartdns.pid
start program = “/usr/sbin/smartdns” with timeout 10 seconds
stop program = “/usr/bin/killall smartdns” with timeout 10 seconds
chmod 0700 /etc/monitrc
测试守护配置
monit -t
启动
rc-service monit start
monit start all
#忽略有个报错
添加启动
rc-update add monit

1
2
3
4
5
git代理设置方法解决
如果执行:git config --global https.proxy http://127.0.0.1:1080 时出现:fatal: not in a git directory

请先执行:git init

个人喜欢先更新一下系统

1
apt update && apt upgrade -y

改为 root 密码登陆

1
2
3
4
echo root:密码 chpasswd root
sed -i 's/^#\?PermitRootLogin.*/PermitRootLogin yes/g' /etc/ssh/sshd_config;
sed -i 's/^#\?PasswordAuthentication.*/PasswordAuthentication yes/g' /etc/ssh/sshd_config;
systemctl restart sshd


开启 BBR

1
2
3
4
5
6
7
8
9
10
11
12
13
14
15
#修改系统变量
echo "net.core.default_qdisc=fq" >> /etc/sysctl.conf
echo "net.ipv4.tcp_congestion_control=bbr" >> /etc/sysctl.conf


#保存生效
sysctl -p


#查看内核是否已开启BBR
lsmod grep bbr


#显示如下,即成功
tcp_bbr 20480 2

放行全部端口(重启失效)

1
2
3
4
5
iptables -P INPUT ACCEPT
iptables -P FORWARD ACCEPT
iptables -P OUTPUT ACCEPT
iptables -F
iptables-save

  持续化规则(重启不失效)

1
2
3
4
5
6
7
#安装iptables-persistent
apt install iptables-persistent


#永久保存规则
netfilter-persistent save
netfilter-persistent reload

对于关闭防火墙更暴力点的方法,可以选择如下两种

1
2
3
4
5
rm -rf /etc/iptables && reboot

rm -rf /etc/iptables/rules.v4
rm -rf /etc/iptables/rules.v6
reboot

同时你也需要进入后台配置一下入站规则,我是开放的所有协议 然后你就可以干点你想做的了,至于 DD 系统,我打算过段时间再搞,现阶段封号的太多了 已找甲骨文适配的 DD 脚本,下方演示为 Debian 10

1
bash <(wget --no-check-certificate -qO- 'https://raw.githubusercontent.com/MoeClub/Note/master/InstallNET.sh') -d 10 -v 64 -p "密码" -port "端口"

Linux面板7.7.0升级专业版命令:

1
curl https://download.moetas.com/install/update6.shbash

Debian安装命令:

1
wget -O install.sh https://download.moetas.com/install/install-ubuntu_6.0.sh && bash install.sh

Centos安装命令:

1
yum install -y wget && wget -O install.sh https://download.moetas.com/install/install_6.0.sh && sh install.sh

转自:https://fenhao.me/10.html

一:降低 IPv6的优先级,优先使用IPv4 默认的安装中,IPV4 和 IPV6 并存,并且 IPV6 却优先于 IPV4。如果不需要彻底关闭 IPV6,可以设置让 IPV4 优先于 IPV6。配置方式如下:

echo “precedence ::ffff:0:0/96 100” >>/etc/gai.conf

当然也可以直接修改 /etc/gai.conf 文件,找到下面这一行

#precedence ::ffff:0:0/96 100

把前面的#去掉即可。 二:设置 GRUB 启动参数禁用 IPv6 编辑 /etc/default/grub,找到 GRUB_CMDLINE_LINUX_DEFAULT="quiet" 修改为:

GRUB_CMDLINE_LINUX_DEFAULT=”ipv6.disable=1 quiet”

随后执行命令 update-grub 更新 grub 启动参数,重启系统即可。

ABP 兼容规则

Easylist China

ABP官方维护的的适合国内使用的规则,更新频繁。 https://easylist-downloads.adblockplus.org/easylistchina.txt

CJX’s Annoyance List

这是”EasyList China+EasyList” & “EasyPrivacy”的补充。2015.2.4发布,过滤烦人的自我推广,并补充EasyPrivacy隐私规则. https://gitee.com/cjx82630/cjxlist/raw/master/cjx-annoyance.txt

ADgk

一个专门为安卓版adguard写的规则,适合在手机浏览器中使用的拦截规则。 https://gitee.com/banbendalao/adguard/raw/master/ADgk.txt

X浏览器内建规则 ad-rules-for-xbrowser

由X浏览器作者维护的内建拦截规则,不定期更新,主要适用于手机端网站。其中一些规则语法是X浏览器独有的,只能在X浏览器中使用。 github: https://github.com/examplecode/ad-rules-for-xbrowser gitee: https://gitee.com/examplecode/ad-rules-for-xbrowser

jiekouAD

X浏览器QQ群管理员大萌主,维护的专门针对手机端盗版网站广告的拦截规则. https://gitee.com/damengzhudamengzhu/guanggaoguolv/blob/master/jiekouAD.txt

乘风广告过滤规则

乘风广告拦截资源在国内的镜像源 https://gitee.com/xinggsf/Adblock-Rule/raw/master/rule.txt

乘风视频过滤规则

乘风视频广告拦截资源在国内的镜像源 https://gitee.com/xinggsf/Adblock-Rule/raw/master/mv.txt

Anti-AD

号称是目前中文区命中率最高的广告过滤列表,实现了精确的广告屏蔽和隐私保护 github: https://raw.githubusercontent.com/privacy-protection-tools/anti-AD/master/anti-ad-easylist.txt cdn加速 https://cdn.jsdelivr.net/gh/privacy-protection-tools/anti-AD@master/anti-ad-easylist.txt

广告终结者插件使用的拦截规则

广告终结者使用的拦截规则,基于ChinaList+EasyList修正维护 http://sub.adtchrome.com/adt-chinalist-easylist.txt

EasylistChina+EasylistLite+CJX’sAnnoyance

由 halflife 维护的拦截规则 ,合并了 EasylistChina、EasylistLite、CJX’sAnnoyance,以及补充的一些规则,每日更新。 https://gitee.com/halflife/list/raw/master/ad.txt

主机列表

yhosts

yhosts是国内比较知名的host维护列表,原作者目前已经停止维护,目前由VeleSila接手更新。 https://raw.githubusercontent.com/VeleSila/yhosts/master/hosts.txt

1024网站及澳门皇家赌场及恶意广告主机列表

1024网站及澳门皇家赌场及恶意广告主机列表,你懂得 https://raw.githubusercontent.com/Goooler/1024_hosts/master/hosts

iOSAdblockList

有海外维护针对移动网站的广告主机列表 https://raw.githubusercontent.com/BlackJack8/iOSAdblockList/master/iPv4Hosts.txt

StevenBlack

国外维护比较知名的屏幕广告主机列表,整合和扩展多个精心设计的主机文件. github上获得15k+ Start 可以通过脚本生成你自己的hosts文件。 https://raw.githubusercontent.com/StevenBlack/hosts/master/hosts

Hblock

Hblock是一个脚本程序,他会自动提取来自很多规则源的恶意广告主机列表,比如 EasyList,AdGuard,uBlock ,disconnect.me 等数十个规则源,下面的链接是由该脚本生成的主机列表。 https://hblock.molinero.dev/hosts

MVPS host

屏蔽美欧地区英文网站相关的广告 http://winhelp2002.mvps.org/hosts.txt

hmirror

来自海外西班牙用户整理的各种主机拦截资源汇总,包括来自adguard,easylist,ublock的主机资源. 下面是主机资源汇总页面 https://github.com/hectorm/hmirror/

其他广告拦截资源汇总

easylist 相关的资源汇总

包括EasyList, EasyPrivacy, EasyList Cookie, Fanboy’s Social/Annoyances/Notifications Blocking List等 https://github.com/easylist/easylist/

uBlockOrigin 相关资源汇总

https://github.com/uBlockOrigin/uAssets

Adgurad 拦截规则资源分类汇总

https://kb.adguard.com/en/general/adguard-ad-filters

来自海外用户整理的规则源

Annoyances https://filters.adtidy.org/extension/chromium/filters/14.txt Simplified Domain Names https://filters.adtidy.org/extension/chromium/filters/15.txt Fanboy’s Social Blocking List https://easylist.to/easylist/fanboy-social.txt Fanboy’s Annoyances List https://easylist.to/easylist/fanboy-annoyance.txt Fanboy’s Enhanced Tracking List https://fanboy.co.nz/enhancedstats.txt Adblock Warning Removal List https://easylist-downloads.adblockplus.org/antiadblockfilters.txt Anti-Adblock Killer Reek https://raw.githubusercontent.com/reek/anti-adblock-killer/master/anti-adblock-killer-filters.txt Malware Domains https://easylist-downloads.adblockplus.org/malwaredomains_full.txt Peter Lowe’s List http://pgl.yoyo.org/adservers/serverlist.php%3Fhostformat%3Dadblockplus%26mimetype%3Dplaintext Prebake https://raw.github.com/liamja/Prebake/master/obtrusive.txt Spam 404 https://raw.githubusercontent.com/Dawsey21/Lists/master/adblock-list.txt BarbBlock https://raw.githubusercontent.com/paulgb/BarbBlock/master/blacklists/adblock-plus.txt NoCoin Adblock list https://raw.githubusercontent.com/hoshsadiq/adblock-nocoin-list/master/nocoin.txt

去广告效果检测网站

参考资料

0%